Tuesday, August 28, 2012

Bakin' With The Cake Ladies: The Fresh Coconut Cake

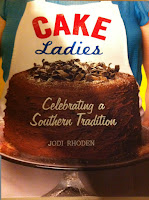
A couple of months ago, I picked up The Cake Ladies by Jodi Rhoden. I have to say this is one of my favorite cake books because all of the recipes look delicious. Being new to the South, I thought I'd bake my way through the book and post pictures and reviews of the cakes as I make them each week.


 Since coconuts seem to allude the masses, I mean aside from granola and shrimp dishes, a lot of people just pass it by in the store labeling it "too much trouble." Jodi Rhoden's book takes this brown bomb and show you how to peel the inner goodness out with ease and turn it into a spectacular treat....The Fresh Coconut Cake.  This cake is delicious without the frosting, which I recommend not making unless you have a double boiler (I had to improvise). The Fresh Coconut Cake is a sweet treat that needs to be eaten within a day, so taking it to a banquet or office party will surely be worth the time spent....and don't be surprised if someone thinks you are a goddess with an oven.

Getting Back On Track...

A lot has happened in the last month or so that I haven't posted, we completed our cross country move where it is safe to say things are a whole lot different around here. I'm sad to report that I did miss the majority of canning season, so I guess better luck next year for me :( I'm sure there are serious canners who would have just put up a bunch of jars and packed them for the move, but being as many of my dishes didnt make it, I wasnt going to chance breaking my jars too. I did, however, get to put up a few jars of fruit cocktail, pineapple, pears, peach butter, spicy carrots, drunken cherries, and chocolate cherry dessert sauce. Needless to say, i've been keeping busy.

The move was long, 4 days of what seemed like endless traveling with dogs, cats, and two birds that all seemed to be getting more miserable as the miles passed behind us. I was excited to pass through Amarillo, TX and visit the AQHA Museum which far surpassed my expectations...as many of my closest friends are aware I am not a fan of the Quarter Horse. I know, to many I have just committed the ultimate sin...my mom had Quarter Horses and they just arent for me. Im a Draft Horse girl, my horses were always ready to work or do whatever I asked of them and the Quarter Horses **Our Quarter Horses** were lazy and freaked out when ever introducing something new. I guess they are creatures of habit....whatever. Getting back to the museum, it honestly gave me an appreciation I never had for Quarter Horses as I walked the hallways filled with amazing animals and true assets to the breed.

Now that I am here, getting used to the people who view me as a clear outsider, one thing I am really excited about is the amount of farmer's markets, or "fresh markets" as they are called here. There are a lot of people offering Organic goods, but I still cant wait until my garden is planted and producing because my canning habit is getting expensive. I am also anxiously awaiting the arrival of the goats and chickens I will be adding next spring.

On a more amusing note, I finally discovered grits. Being born and raised in Southern California, I have heard of grits but I have never tried them, my first visit to the local Waffle House with a friend cured that. They were shocked that I have never tried them before, but when I explained where I was from they quickly grabbed me a sample bowl and I was able to try them with sugar and plain. Apparently, "I'm from California" can be a good excuse for everything.....including my (on occasion) bad behavior :)


I hope no one else missed the prime canning season on account of a long move.

Wednesday, July 11, 2012

Repurposing: Indoor Herb Garden

As a Mason Jar fanatic, I never thought of using my jars for anything other than displaying food. However, this is an idea I think I am going to try. With new jars of course....lol I cant bring myself to use my old ones.

What you will need:
Mason/Kerr/Ball Jars
A Board (can be stained or distressed, your choice)
Nails or Screws
Hose Clamps (Large enough to fit your jars)
Potting Soil
Pea Gravel
Herbs

Directions:
1. Place a little bit of the pea gravel at the bottom of each jar. Fill the jar with potting soil and plant the herb.
2. Attach the clamp to the board with a nail or screw.
3. Hang the board in the desired area.
4. Place the jar inside the clamp and close so the jar is now attached to the board.
5. Enjoy your new herb garden!

Repurposing: Corks

I saw this posted to my FaceBook page and I had to repost it here.

What you need:
Corks
Twine
Discarded Forks
A Marker

Directions:
Write the name of the herb/veggie on the cork. Wrap the forks in twine, stick the corks onto the fork, and plant. Now you will never confuse your herbs or veggies again.

Saturday, June 30, 2012

Good To Know...

In an emergency situation it is always good to know what your blood type is and who you can give and receive blood from.

Friday, June 29, 2012

Mason Jar Collections

Just when you think you have a pretty awesome collection going, you run into something like this. Here is a man with a pretty serious Mason/Ball jar collection http://www2.wcoil.com/~aux/MB/MB.html. Although I have been seriously humbled, I have added the site so others can see the various styles and types of jars put out over the years. Apparently, they give tours, so if youre in the neighborhood and want to check out the jars and learn a lot you should check it out. Have fun!

Thursday, June 28, 2012

Butter In A Mason Jar

What You Will Need:
2 Pints Heavy Whipping Cream
A Jar (I used 2 Quart Jars)
A Marble (I Made 2 Batches, So 2 Marbles)


Pour cream into the jar, drop in the marble, close the lid, and start shaking.


Keep checking the mixture every 3 to 4 minutes, the consistency will change from whipped cream, to little clumps of butter.

The texture will change from this...

to this.


Continue shaking for a few minutes then drain the liquid from the jar. **This is the buttermilk, you can keep it for future use or discard**

Drain Buttermilk
We have achieved butter!
Rinse until water runs clear
The butter is now ready for use; however, if you are going to store it, it should be washed. Add ½ C ice water to the jar and shake for another 3 minutes. Drain the water and repeat the process until the water is clear. Mash the butter to strain the remaining water from the butter.

If you would like to add more flavor to your butter, you can mix in salt or fresh herbs.

Scoop the butter into a mold, container, or wax paper to store in the refrigerator.

Butter can also be made in the blender if you aren’t up for the shaking. I’m thinking this is perfect for the Huckleberry to do during football season. ;)
Butter during the rinsing stage
Texture

**Note: I started with all of the ingredients in 1 jar, but it was taking to long (im impatient), so I split it up into 2 quart jars and the process went way faster.
Done!

Canning: Things To Remember

1. It goes without saying that the quality of ingredients you use for your home canned goods will reflect the taste of the creation you have made.
2. By using fresh pectin, you can ensure you get a good gel in your jams and jellies.
3. Always wipe the rims of canning jars before and after processing with a clean, damp cloth to ensure there are no food particles that could lead to fluid siphoning and poor seals.
4. Never use rusted or bent bands as they can prevent a good seal on your jars.
5. Remove bands before storing jars to prevent them from rusting.
6. Remember to use proper headspace to ensure good seals.
                                                        ¼ Inch- Jams & Jellies
                                                        ½ Inch- Fruits & Tomatoes
       1-1 ¼ Inch- Low Acid Pressure Canned Items
7. Never place a hot jar on a cold surface or in the refrigerator. They will crack or bust.
8. Never taste suspicious foods, although this is good general advice I should specify, never taste home processed canned suspicious foods. If something has spoiled, detoxify the jar and contents by placing the entire jar in a boiling water bath canner; bring contents to a boil, dispose of carefully so it is not consumed by humans or animals. Be sure to also dispose of wash cloths that came in contact with the spoiled jar.
9. Always refrigerate jars after opening.

Books To Consider

Blue Ribbon Preserves by Linda J. Amendt – I found this book at the library, it contains a wealth of information on fair competitions and canning various recipes.

The Ball Blue Book- A good starting point for canners.

The Complete Book of Home Preserving offered by Ball- This book has been noted as “The Canning Bible” by canners all over.

Homesteading by Abigail R. Gerhring- If the Ball book is “The Canning Bible,” this book could very well be noted as “The Homesteading Bible” as it contains everything one needs to set up a successful homestead.

Homesteading on Half an Acre by Storey- Comparable to Abigail Gerhring’s book, but has more information on animals and trees.

The Homemade Pantry:101 Foods You Can Stop Buying & Start Making by Alana Chernila- My new favorite book, if you think that the grocery store is your only option...think again. I was sure I would have to buy my pop tarts forever, she even has a recipe for Twinkies....yes! I said it, Twinkies. Can a book get any better? For me, it doesn't.

This is an on-going list… there will be more.

Heirloom Seeds

I started canning because I wanted to make jam, it began as a fun thing I could do in my spare time. Around the same time, I was taking Anatomy and Health courses to finish off my degree and both instructors were saying the same thing….do you have any idea what is in the food you are eating. I would seem simple enough, fruit cocktail is just mixed fruit and diet soda is with a sweetener rather than a can of sugar. We were very wrong, along with the fruit cocktail comes an array of chemicals may people, including myself, have a hard time pronouncing. The diet soda has sweeteners such as NutraSweet (Sweet N Low), which my mom uses and, admittedly, I do too or more recently Aspartame, or Equal. My Anatomy instructor, who will remain nameless because he publishes his own books, informed us that Aspartame probably would not be on the market had it not been for a friend at the FDA who helped push it through, and since its launch into society as a sugar substitute, diseases such as Alzheimer’s has been on the rise. Sweet N Low is pegged for causing cancer, although lab tests have shown that in order to get cancer from Sweet N Low, one would have to ingest substantial amounts, not just a morning cup of coffee, but gallons on a daily basis. In comparing the less of two equals, and because I don’t care for the taste of Splenda or Truvia, I’ll be sticking with sugar for baking and Sweet N Low for my coffee. 
After seeing posts and articles on Monsanto and other GMO products finding their way into the marketplaces unannounced and unlabeled, my desire to begin my own garden was given a healthy shove. I came across a company that is one of the few remaining heirloom seed providers; D. Landreth Company http://www.landrethseeds.com/ offers an online marketplace as well as a beautiful catalog ($5.00) to purchase seeds. Their staff is informative, unlike Lowes and Home Depot, who really don’t know “shit from Shineola” as that saying goes. The variety is amazing and the quality is excellent.

Recipe Exchange

I am thinking it would be interesting & fun to have a recipe exchange here on the blog so as the reader base grows new recipes can be found and traded. I’m going to try and figure out a way to post recipes directly into the blog without them having to show up as a comment. Maybe you can submit them to me and I can just post them in one general location for all to find? Sometimes you just wanna add a little extra pick-up in your jars. What do you think?

Mason Jar Dating


1896-1910


No, I’m not offering up a dating service for lonely canners. I’m talking about finding a way to put a realistic date on these old jars we are sometimes lucky enough to find in old barns, yard sales, and antique markets. I came across a webpage that said one was from the early 1900’s and another that said the same jar was 1970’s issue. I did find a rather informative site that explains how to date jars by the way the wording is inscribed http://home.earthlink.net/~rclayDatingBalljars.HTML .I don’t think this is a post that I will be able to complete quickly and leave it; I think this will be an ongoing post that will be edited as often as I find new material. What I would like, is to have a post with many photos of jars and an age or approximate age. Not so much as a how much is my jar worth kinda thing, but wow I have really old jars thing. I have found out about The Collectors Guide To Old Fruit Jars Redbook No. 10 for people who would like to sell their jars to price them accordingly which can be found be going to www.redbookjars.com. If anyone has super old jars they would like to share….send them in and I’ll post them here.

1910-1923


Saturday, June 23, 2012

Getting Started: Tools of the Trade

Some of these items may already be in your kitchen arsenal, and others you may not need right away or at all.

Canning Jars- Assorted Sizes
2 Piece Lids (Ring and Lid) **Note: Lids are NOT reusable***
Jar Lifter
Pressure Canner (For Low Acid Foods/Vegetables)
Stock Pot (For water bath processing- High Acid Foods)
Canning Rack
Saucepans
Chopping Boards
Cooling Racks (I use a foam-like cabinet liner)
Potato Masher
Assorted Spoons (Wooden, Slotted, & Stainless Steel)
Ladle
Measuring Cups & Spoons
A Good, Sharp Knife
Collander/Strainer
Wide-Mouth Funnel
Rubber Gloves (For Cutting Peppers)
Candy Thermometer
Apple Corer
Zester
Cherry Pitter
Plastic Knife/Spatula (To remove air bubbles)
Lid Wand (To reach into the boiling depths & grab rennegade lids)
Cheesecloth
Food Mill
Sieve
Marker or Jar Labels **Be sure to note whats in the jar and when it was made, seriously, people forget**


These ingredients are good to have on hand:
Bottled Lemon Juice (To Maintain PH & Acidity)
Vinegar
Sugar
Salt
Pickling Lime
Clear-Jel (Thickener for pie fillings)

Syrups For Canning Fruits

The type of syrup you decide to pack your fruit in is entirely up to you. As a general calculation, you will need about 1 C to 1 1/2 C syrup per quart of fruit.

Directions:
Bring syrup to a boil over medium-high heat, stirring until sugar is dissolved. reduce the heat and keep syrup warm, without boiling it down, until you are ready to use it.

Syrup Types:
Ultra-Light  1/2 C Sugar + 5 C Water = 5 1/4 C Syrup
Extra-Light 1 1/4 C Sugar + 5 1/2 C Water = 6 C Syrup
Light 2 1/4 C Sugar + 5 1/4 C Water = 6 1/2 C Syrup
Medium 3 1/4 C Sugar + 5 1/4 C Water = 6 1/2 C syrup
Heavy 4 1/2 C Sugar + 4 1/4 C Water = 7 C Syrup
Honey 1 C Sugar + 1 C Liquid Honey + 4 C Water = 5 C Syrup
Corn Syrup 1 C Sugar + 1 C Corn Syrup + 4 C Water = 5 C Syrup

Jars:

I do have a strange preoccupation with only using Mason & Kerr jars. I suppose, aside from having the most reliable reputation, the name is important. After all, my last name is Mason and my Great Grandmother's last name was Kerr, so in a way, I feel like I was destined to be a canner.

Odly enough, although that side of the family is Mormon, I am the only real canner in the family that I know of. Not that all Mormons can, but it is a skill many are happy to teach :)

I have recently taken my new found, strange obsession to another level- looking for old canning jars. Last year, I was given a box that looked as if it had spent decades collecting dust in a garage. I was plesantly surprised when I discovered "Presto" Mason jars in excellent condition. Although I would never dream of using these jars in a pressure caner, I have used them for water bath processing. My batch of mixed peppers looked gorgeous!

While cleaning out our barn, I found a set of 4 blue bale top canister Mason jars. Covered in dirt and dust, they didn't look like much, but after a soak in soapy water with a drop of vinegar... they looked almost brand new.

While the Antelope Valley doesn't offer much in the way of gardening, I am fortunate to live close to an antique shop. For the past 6 months I've been driving past and commenting on how much cool stuff must be stashed inside this old building. Since we are moving out of state, my curiosity got the better of me and my mom and I stopped in for a look. Let me just say, on the outside it doesn't look like much, but on the inside it's a wonderland of stuff. There seemed to be a never ending supply of gadgets, signs, dolls, and a plethora of canning jars, which thrilled me. Although my self control was seriously tested, I managed to get out of there only buying 4 jars and spending around $30.00. My bounty contained a tall (1 1/2 qt?) blue Mason jar with a zinc lid, a Mason jar with an anchor design, a bicentennial Mason jar, and a clear 1 quart canister Mason jar with a bale lid.
These jars are too old for canning (in my opinion), so they will spend their retirement holding spices and other pantry items. Now I'm on the hunt to find gaskets to fit my jars. I've seen them on eBay for around $1.00 a piece, but if there are other resources out there, please drop me a line and let me know.


Nonetheless, if you are in the Antelope Valley, CA area be sure to check out The Barn Antiques located at 6851 W Avenue I Lancaster, CA 93536 (661) 726-9556. You won't be disappointed.

Wednesday, June 20, 2012

Canning Crazy

This winter seemed like a haze of caning one thing after another. I decided to make jams and herb enhanced olive oils as Christmas presents for friends and family. I'm not lucky enough to have a garden or live in an area blessed with farmers markets, but the Costco in my are had an excellent blackberry & raspberry selection. I also ended up with a decent supply of strawberries, so I made a lot of jam. Since cranberries were also in large supply, I made several batches of whole berry cranberry sauce, which ended up being in high demand.


The oils were easy to make and received a lot of compliments as well. we did a garlic & chili pepper and a poultry blend which consisted of garlic, rosemary, thyme, sage and oregano. I made them with about 2 weeks to spare so they could season and be ready for use. They were aromatic, delicious, and very pretty.
It's nice that my family is supportive of my new habit, my niece and nephew have even contributed jars to the cause...along with their requests, of course.

Saturday, June 16, 2012

To Much Or Not Enough

So my first canning "experience" was a bust. The Huckleberry likes pears and I was feeling adventurous, so I took myself down the canning isle at Wal-Mart to see what they had to offer. The pickings were slim; this may have been my first mistake because "canning season" was over. Anyway, I got a case of half-pint jars (Mason of course), a canning discovery kit, a giant pot, and since they were out of Sure, I decided to go with a flex-batch pectin rather than the single dose I was looking for. Needless to say, I ended up making something resembling more of a pear syrup than a jam.
No worries though, I was so excited and determined to become a master canner I bought way more fruit than I needed, so I just started a new batch. The only problem was I used the same flex-batch pectin. I managed to convince myself that I measure the wrong amount the first time around, therefore proper reasoning said to add a little extra for good measure. Wrong! This batch, while having more of a jam appearance, set up so thick that it was hard to spread once it was refrigerated.
Moral of the story: Laugh at the mistakes made during creation processes, learn from them, keep trying, and just buy the boxes of pre-measured pectin.